Debian Stretch 9.5 with imx_4.9.88_2.0.0_ga-var01 Linux release
Overview
This page describes how to build and install Debian distribution (Stretch) on Variscite boards with VAR-SOM-MX6.
Please note that the build script is based on debootstrap. As described in the following instructions, it's kindly suggested to create the build folder on the main Ubuntu volume on your host PC rather than an external media.
Using an external media, although automatically mounted, will cause debootstrap to complain about access rights (even when running the script with sudo).
For additional details about this release, refer to the Release Notes.
Create build environment
These instructions were tested on Ubuntu 16.04/18.04 x64 host PCs. When using other distributions, there may be issues.
Note: Variscite provides Docker containers that can be used for a development environment as an alternative to using a virtual machine or a dedicated computer.
To learn more, please see Variscite's Docker Build Environment guide.
Windows with WSL/WSL2 is not supported for development
Installing required packages
On Ubuntu building machine:
$ sudo apt-get install binfmt-support qemu qemu-user-static debootstrap kpartx \
lvm2 dosfstools gpart binutils bison git lib32ncurses5-dev libssl-dev gawk wget \
git-core diffstat unzip texinfo gcc-multilib build-essential chrpath socat libsdl1.2-dev \
autoconf libtool libglib2.0-dev libarchive-dev xterm sed cvs subversion \
kmod coreutils texi2html bc docbook-utils help2man make gcc g++ \
desktop-file-utils libgl1-mesa-dev libglu1-mesa-dev mercurial automake groff curl \
lzop asciidoc u-boot-tools mtd-utils device-tree-compiler flex cmake zstd udisks2  libgnutls28-dev \
python-pysqlite2 python-git python-m2crypto python-pyelftools
Deploy source
Important update:
As of March 31, 2023, all codeaurora.org repositories have been migrated to other platforms, and the project has been shut down.
For more information, please visit: https://bye.codeaurora.org/
In this context, errors may occur when deploying the Debian sources, such as:
fatal: unable to look up source.codeaurora.org (port 9418) (No address associated with hostname)
Variscite has updated all relevant software repositories. Please refer to the patch(es):
Download archive containing the build script and support files for building Debian Stretch for this board:
$ cd ~
$ git clone https://github.com/varigit/debian-var.git -b debian_stretch_mx6_var02 debian_var-som-mx6
Create environment (Internet connection should be available):
This environment prepared to build.
Make Debian
Build all
Internet connection should be available
Build by parts
Build bootloader
Build kernel, dtb files, kernel modules, and kernel headers
$ cd ~/debian_var-som-mx6
$ sudo ./make_var_som_mx6_debian.sh -c kernel
$ sudo ./make_var_som_mx6_debian.sh -c modules
$ sudo ./make_var_som_mx6_debian.sh -c kernelheaders
Build rootfs
Internet connection should be available
Pack rootfs
To create the root file system archive (rootfs.tar.gz), run the following commands:
Create boot SD card
- Follow the above steps for make rootfs, kernel, bootloader;
- Insert the SD card to card reader connected to a host system;
- Run the following commands (Caution! All data on the card will be destroyed):
where '/dev/sdX' path to the block SD device in your system.
Create a boot SD card image using a loop device
It is also possible to use the "./make_var_som_mx6_debian.sh" script to create a boot SD card image, while using a loop device instead of attaching a real SD card.
Create an empty file using the following command:
The above command creates a 3700MiB file representing the SD card.
Attach the first available loop device to this file:
To find the actual loop device being used, run:
Write the content to the loop device to generate the SD card image:
(Replace /dev/loopX with your actual loop device, e.g. /dev/loop0)
Detach the loop device from the file:
To compress the SD card image file use the following command:
To write the SD card image to a real SD card device use the following command:
(Replace /dev/sdX with your actual SD device, e.g. /dev/sdb)
Boot the board with a bootable SD card
Setting the Boot Mode
Follow the instruction below according to the appropriate carrier board type:
MX6CustomBoard
Booting your MX6CustomBoard system from SD card requires pushing the middle button while powering up the system. See picture below.
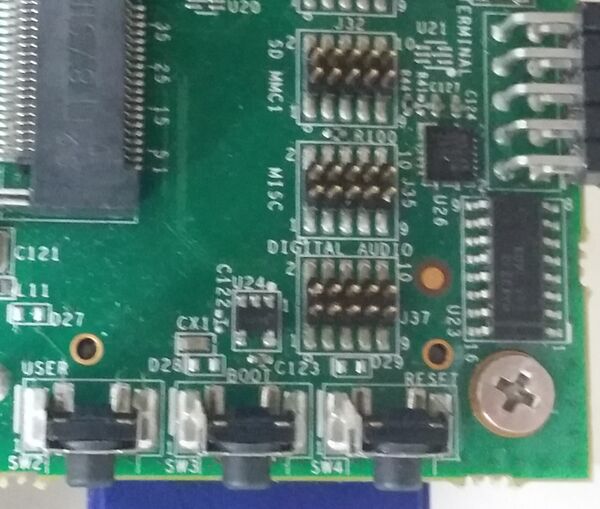
To boot a board using an SD card, follow the steps below:
- Power-off the board.
- Insert the SD card into the SD/MMC slot of the carrier board (DVK)
- Push the middle button (Boot Select) and hold
- Power-up the board
- Release the middle button (Boot Select) after system starts to boot.
- The board will automatically boot into Linux from the SD card
SoloCustomBoard
Booting your system requires switching the relevant DIP switch to "Boot from MMC". See picture below.
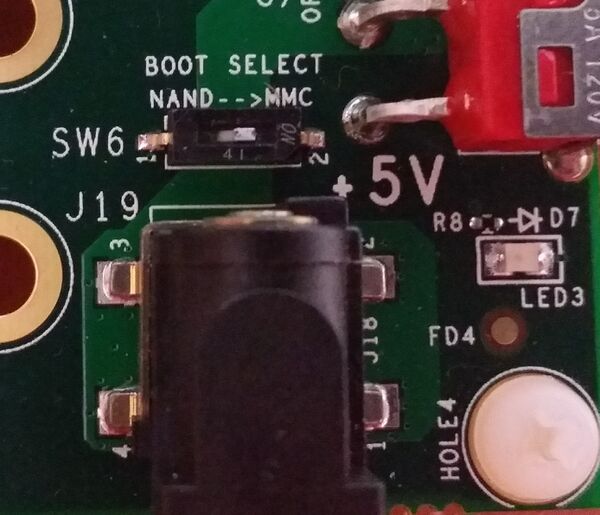
To boot board with SD card, Follow the steps below:
- Power-off the board.
- Insert the SD card into the SD/MMC slot of the carrier board (DVK)
- Switch the relevant DIP switch to "Boot from MMC"
- Power-up board
- The board will automatically boot into Linux from SD card
DT6CustomBoard
Booting your system requires switching the relevant DIP switch to "Boot from SD card". See picture below.
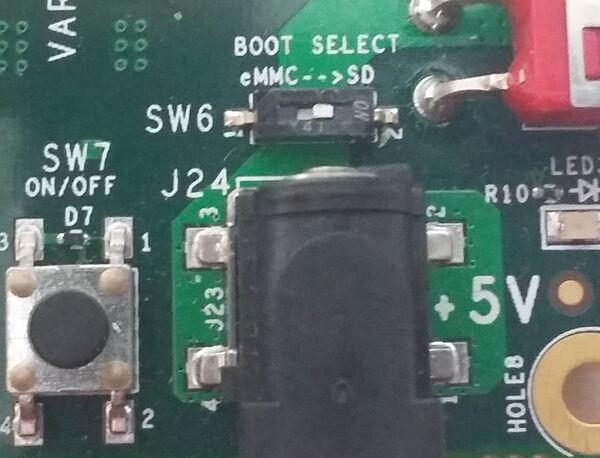
To boot board with SD card, Follow the steps below:
- Power-off the board.
- Insert the SD card into the SD/MMC slot of the carrier board (DVK)
- Switch the relevant DIP switch to "Boot from SD card"
- Power-up board
- The board will automatically boot into Linux from SD card
Automatic device tree selection in U-Boot
As shown in the Build Results table above, we have different kernel device trees, corresponding to our different H/W configurations (sometimes they are renamed without the "uImage-" prefix).
We implemented a script in U-Boot's environment, which sets the fdt_file environment variable based on the detected hardware.
Enable/Disable Automatic Device Tree selection
To enable the automatic device tree selection in U-Boot (already enabled by default):
To disable the automatic device tree selection in U-Boot, set the device tree file manually:
Build Results
The resulted images are located in ~/debian_var-som-mx6/output/.
|
Image name
|
How to use
|
|---|---|
| rootfs.tar.gz | Root filesystem tarball used for installation on SD card and eMMC |
| uImage | Linux kernel image |
| SPL.nand | SPL built for NAND. The SPL is pre-U-Boot SW component, required for DDR initialization |
| SPL.emmc | SPL built for SD card and eMMC boot. The SPL is pre-U-Boot SW component, required for DDR initialization |
| u-boot.img.nand | U-Boot built for NAND flash |
| u-boot.img.mmc | U-Boot built for SD card or eMMC boot |
|
Device Tree name
|
Details
|
| imx6dl-var-som-solo-cap.dtb | VAR-SOM-SOLO with iMX6S/DL on MX6CustomBoard with capacitive touch |
| imx6dl-var-som-solo-res.dtb | VAR-SOM-SOLO with iMX6S/DL on MX6CustomBoard with resistive touch |
| imx6dl-var-som-solo-vsc.dtb | VAR-SOM-SOLO with iMX6S/DL on SOLOCustomBoard with capacitive touch |
| imx6dl-var-som-cap.dtb | VAR-SOM-MX6 with iMX6S/DL on MX6CustomBoard with capacitive touch |
| imx6dl-var-som-res.dtb | VAR-SOM-MX6 with iMX6S/DL on MX6CustomBoard with resistive touch |
| imx6dl-var-som-vsc.dtb | VAR-SOM-MX6 with iMX6S/DL on SOLOCustomBoard with capacitive touch |
| imx6q-var-som-cap.dtb | VAR-SOM-MX6 with iMX6D/Q on MX6CustomBoard with capacitive touch |
| imx6q-var-som-res.dtb | VAR-SOM-MX6 with iMX6D/Q on MX6CustomBoard with resistive touch |
| imx6q-var-som-vsc.dtb | VAR-SOM-MX6 with iMX6D/Q on SOLOCustomBoard with capacitive touch |
| imx6qp-var-som-cap.dtb | VAR-SOM-MX6 with iMX6DP/QP on MX6CustomBoard with capacitive touch |
| imx6qp-var-som-res.dtb | VAR-SOM-MX6 with iMX6DP/QP on MX6CustomBoard with resistive touch |
| imx6qp-var-som-vsc.dtb | VAR-SOM-MX6 with iMX6DP/QP on SOLOCustomBoard with capacitive touch |
| imx6q-var-dart.dtb | DART-MX6 with iMX6D/Q on DARTCustomBoard with capacitive touch |
Linux console access
| User name | User password | User descriptor |
|---|---|---|
| root | root | system administrator |
| user | user | local user |
| x_user | used for X session access |
Flash images to eMMC
To install Debian to the on-SOM eMMC, run the following command as root:
where the "-b" option provide the carrier board used (MX6CustomBoard/SOLOCustomBoard/DART-MX6) and the "-t" option provide the touch type when using MX6CustomBoard (ignored otherwise). The above script is located in /usr/sbin in the rootfs of the SD card used to boot Debian.
How-to: Test and use an interface
Please see this section in the Yocto developer guide page. It is the same for Debian.
How-to: Modify the kernel configuration
To modify the kernel configuration (add/remove features and drivers) please follow the steps below:
1. $ cd ~/debian_var-som-mx6/src/kernel
2. $ sudo make ARCH=arm mrproper
3. $ sudo make ARCH=arm imx_v7_var_defconfig
4. $ sudo make ARCH=arm menuconfig
5. Navigate the menu and select the desired kernel functionality
6. Exit the menu and answer "Yes" when asked "Do you wish to save your new configuration?"
7. $ sudo make ARCH=arm savedefconfig
8. $ sudo cp arch/arm/configs/imx_v7_var_defconfig arch/arm/configs/imx_v7_var_defconfig.orig
9. $ sudo cp defconfig arch/arm/configs/imx_v7_var_defconfig
10. Follow the instructions above to rebuild kernel and modules, repack rootfs images and recreate SD card
Build a sample C "Hello, world!" program
Create a file called myhello.c with the following content:
Export the C (cross-)compiler path:
$ export CC=~/debian_var-som-mx6/toolchain/gcc-linaro-6.3.1-2017.05-x86_64_arm-linux-gnueabihf/bin/arm-linux-gnueabihf-gcc
Compile:
Now you should have an app called myhello, that can be run on your target board.
You can add it to your rootfs image or copy it directly to the rootfs on the board (using scp, for example).