MCUXpresso 25.06.0
Overview
Release Notes
For full details about this release, refer to the Release Notes.
MCUXpresso SDK
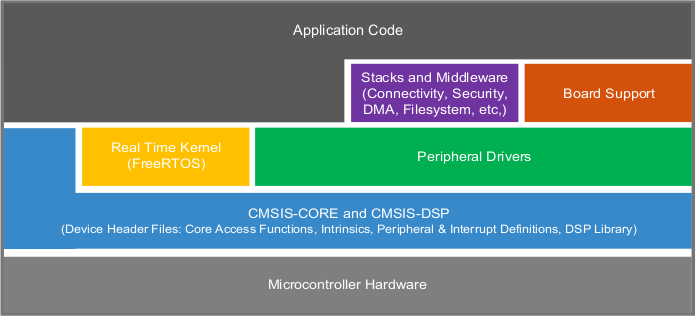
MCUXpresso SDK board support provides example applications for NXP development and evaluation boards for Arm Cortex-M cores. Board support packages are found inside of the top level boards folder, and each supported board has its own folder (MCUXpresso SDK package can support multiple boards). Within each
- cmsis_driver_examples: Simple applications intended to concisely illustrate how to use CMSIS drivers.
- demo_apps: Full-featured applications intended to highlight key functionality and use cases of the target MCU. These applications typically use multiple MCU peripherals and may leverage stacks and middleware.
- driver_examples: Simple applications intended to concisely illustrate how to use the MCUXpresso SDK’s peripheral drivers for a single use case.
- rtos_examples: Basic FreeRTOS OS examples showcasing the use of various RTOS objects (semaphores, queues, and so on) and interfacing with the MCUXpresso SDK’s RTOS drivers.
- multicore_examples: Simple applications intended to concisely illustrate how to use middleware/multicore stack.
Here we describe how to use ARM GCC toolchain, officially supported following Getting Started with Package.
Prerequisites
Before starting, prepare a Yocto boot SD card (with kernel 6.12.20 or newer).
System Manager (SM) change to support Cortex-M7
The SM is an application that runs on Cortex-M33.
The default build configuration for SM does not support Cortex-M7.
To select the required configuration to assign the resources to Cortex-M7, in the file
sources/meta-variscite-bsp-imx/conf/machine/imx95-var-dart.confchange
SYSTEM_MANAGER_CONFIG = "mx95evk"to
SYSTEM_MANAGER_CONFIG = "dart-mx95-m7"
The change enables the compilation of the SM using the dart-mx95-m7.cfg that allows to assign the resources to the Cortex-M7 core.
There is no need to set the fdt_file enviroment variable in U-Boot because it is automatically configured.
To allow Cortex-M7 accessing shared resources without experiencing Linux kernel conflicts, a dedicated device tree will be automatically selected, containing m7 label in the name.
This device tree disables some of the base device tree nodes in order to avoid conflicts between the main processor and Cortex-M7.
|
File Name
|
Description
|
|---|---|
| imx95-var-dart-dt8mcustomboard- m7 .dtb | DART-MX95 device tree blob on DT8MCustomBoard 3.x |
| imx95-var-dart-sonata- m7 .dtb | DART-MX95 device tree blob on Sonata-Board |
Installing required packages
Install cmake
Download and install GNU-ARM bare-metal toolchain:
$ mkdir ~/var-mcuxpresso
$ cd ~/var-mcuxpresso
$ wget https://developer.arm.com/-/media/Files/downloads/gnu/14.2.rel1/binrel/arm-gnu-toolchain-14.2.rel1-x86_64-arm-none-eabi.tar.xz
$ tar xvf arm-gnu-toolchain-14.2.rel1-x86_64-arm-none-eabi.tar.xz
Download MCUXpresso SDK for the SOM:
$ cd ~/var-mcuxpresso
$ git clone https://github.com/varigit/freertos-variscite -b mcuxpresso_sdk_25.06.x-var01
$ cd freertos-variscite
Documentation
Original NXP documentation is available online or in the following folder:
Demos pins
Default M7 pins used by the demos are:
| Function | SoC balls | DART-MX95 pins | DT8MCB pins | Sonata-Board pins | Notes |
|---|---|---|---|---|---|
| LPUART3 RX/TX | P44 / N51 | J2.87 / J2.89 | J12.11 / J12.13 | J6.11 / J6.13 | |
| LPI2C4 SCL/SDA | V48 / V46 | J3.46 / J3.42 | J12.18/ J12.20 | J6.18 / J6.20 | |
| PWM (TPM2_CH2) | E43 | J2.34 | J13.10 | J7.10 | |
| FLEXCAN1 - CAN1_FD (RX/TX) | G45 / F46 | J2.56 / J2.50 | J16.7 (CANH) / J16.9 (CANL) On DT8MCB rev 1.x and DT8MCB rev 3.x TTL levels (CAN transceiver not mounted!) | J10.7 (CANH) / J10.9 (CANL) (CAN transceiver mounted!) | |
| FLEXIO1_PIN12: GPIO output or PWM Output | N45 | J2.86 | J12.4 | J6.4 |
Available demos
All of the Variscite examples are located under the following folder
The available demos for DART-MX95 are:
- driver_examples/lpit/single_channel
- driver_examples/lpit/chained_channel
- driver_examples/lptmr
- driver_examples/lpi2c/polling_b2b/master
- driver_examples/lpi2c/polling_b2b/slave
- driver_examples/lpi2c/interrupt_b2b_transfer/master
- driver_examples/lpi2c/interrupt_b2b_transfer/slave
- driver_examples/lpuart/interrupt_transfer
- driver_examples/lpuart/polling
- driver_examples/lpuart/interrupt_rb_transfer
- driver_examples/lpuart/interrupt
- driver_examples/lpuart/edma_transfer
- driver_examples/sema42/sm
- driver_examples/tpm/output_compare
- driver_examples/tpm/input_capture
- driver_examples/tpm/simple_pwm
- driver_examples/tpm/timer
- driver_examples/tpm/dual_edge_capture
- driver_examples/flexio/pin/led_output
- driver_examples/flexio/pwm
- driver_examples/tstmr
- driver_examples/canfd/ping_pong_buffer_transfer
- driver_examples/canfd/interrupt_transfer
- driver_examples/canfd/loopback
- driver_examples/canfd/loopback_transfer
- driver_examples/edma3/memory_to_memory
- driver_examples/flexcan/ping_pong_buffer_transfer
- driver_examples/flexcan/linux
- driver_examples/flexcan/interrupt_transfer
- driver_examples/flexcan/loopback_edma_transfer
- driver_examples/flexcan/loopback
- driver_examples/flexcan/loopback_transfer
- freertos_examples/freertos_swtimer
- freertos_examples/freertos_sem
- freertos_examples/freertos_mutex
- freertos_examples/freertos_event
- freertos_examples/freertos_hello
- freertos_examples/freertos_generic
- freertos_examples/freertos_queue
- multicore_examples/rpmsg_lite_pingpong_rtos_linux/remote
- multicore_examples/rpmsg_lite_str_echo_rtos/remote
- cmsis_driver_examples/lpi2c/int_b2b_transfer/master
- cmsis_driver_examples/lpi2c/int_b2b_transfer/slave
- cmsis_driver_examples/lpuart/interrupt_transfer
- demo_apps/hello_world
- demo_apps/power_mode_switch
- demo_apps/temperature_measurement
You can build and run the demos following official NXP documentation for IMX95LPD5EVK-19, available online
Building a demo
Building Manually
For any demo, follow these steps:
$ cd ~/var-mcuxpresso/freertos-variscite/boards/dart_mx95
$ cd <demo_folder>
$ cd armgcc
$ export ARMGCC_DIR=~/var-mcuxpresso/arm-gnu-toolchain-14.2.rel1-x86_64-arm-none-eabi
$ ./build_all.sh > /dev/null
You can choose any
Then copy the ".bin" to the boot media (either the SD card or eMMC) in the /boot folder already hosting the Linux device trees.
Building Using Yocto
In Yocto Walnascar and newer, Variscite provides a Yocto recipe for building and installing firmware into the Yocto image:
This recipe installs the following firmware files:
| File | Memory | Loaded Using... |
|---|---|---|
| /boot/cm_<demo name>.bin.release | TCM | U-Boot |
| /lib/firmware/cm_<demo name>.elf.release | TCM | Linux Remoteproc Framework |
If you have modified freertos-variscite in your own Git repository and kept the same directory structure, you can easily build your custom firmware by creating a bbappend file:
$ mkdir -p <your-layer>/recipes-bsp/freertos-variscite
$ nano <your-layer>/recipes-bsp/freertos-variscite/freertos-variscite_25.06.x.bbappend
Append SRC_URI and SRCREV to use your freertos-variscite Git repository
SRC_URI:remove = "git://github.com/varigit/freertos-variscite.git;protocol=git;branch=${MCUXPRESSO_BRANCH};"
SRC_URI:append = " <your Git repository>

SRCREV = "<your Git commit id>"
Append CM_DEMOS to build your firmware. For example, to build rtos_examples/freertos_hello:
# Yocto Hardknott and older
CM_DEMOS_append = "rtos_examples/freertos_hello"

# Yocto Kirkstone and newer
CM_DEMOS:append = "rtos_examples/freertos_hello"
Rebuild fsl-image-gui:
The firmware binary files should now be installed to /boot/ and elf files to /lib/firmware/
Memory types
Here is available a short summary of memory areas used by Cortex-M7 as described in related linker file.
| memory type | M7 memory area | A53 memory area | memory lentgh | linker file |
|---|---|---|---|---|
| TCM |
0x00000000-0x0003FFFF (code)
0x20040000-0x2007FFFF (data) |
0x203C0000-0x203FFFFF (code)
0x20400000-0x2043FFFF (data) | 256kB | MIMX9596xxxxN_cm7_ram.ld |
Linker files
All linker files are locate in the armgcc folder of each demo.
After launching the build_all.sh command the following folder will be created in the armgcc folder
- debug: containing TCM binaries compiled in debug mode (not stripped: symbols available)
- release: containing TCM binaries compiled in release mode (stripped: no symbols available)
Running a demo
Running a demo from U-Boot
To allow Cortex-M accessing shared resources without experiencing Linux kernel conflicts, a dedicated device tree must be loaded.
To enable Cortex-M:
To disable Cortex-M:
To set the name of the Cortex-M binary
The .bin file is expected in the folder /boot of the booting media.
The U-Boot boot command will handle loading the Cortex-M firmware and start Linux for DART-MX95.
For testing, it is possible to run the firmware manually:
Additional details and step by step procedure to run each of the demos is available online
For Yocto Walnascar and newer, this process can be simplified using /etc/remoteproc/variscite-rproc-u-boot
Please refer to the Yocto Scripts section below for more information
Running a demo from Linux
The Linux remoteproc framework can be used to load the Cortex-M7 firmware from Linux userspace.
Follow these steps to verify the Linux remoteproc framework is supported for your release:
- Select the software release from the [DART-MX95](/dart-mx95/ software overview page.
- Click on Release Notes.
- Look for the Cortex M7 Linux remoteproc support row in the release notes to see which version is supported. If Cortex m7 Linux remoteproc support is not in the release notes table, the Linux remoteproc framework is not supported.
After confirming Linux remoteproc support, follow these steps to use the framework:
Boot Linux after following the steps in Running a demo from U-Boot
Increase kernel loglevel while debugging:
Check the state of the m7, it should be running already by U-Boot
If the state is 'running' or 'attached', stop the m7
Load new firmware (.elf file must already exist in /lib/firmware directory)
Run the new firmware
For Yocto Walnascar and newer, this process can be simplified using /etc/remoteproc/variscite-rproc-linux
Please refer to the Yocto Scripts section below for more information
Running a Demo using Yocto Scripts
In Yocto Walnascar and newer, Variscite provides scripts to simplify loading firmware via U-Boot or Linux:
| Script | Description |
|---|---|
| /etc/remoteproc/variscite-rproc-u-boot | Configure U-Boot to load firmware on boot |
| /etc/remoteproc/variscite-rproc-linux | Load and run firmware using Linux remoteproc framework |
Examples variscite-rproc-u-boot example on imx95-var-dart:
root@imx95-var-dart:~# /etc/remoteproc/variscite-rproc-u-boot -f /boot/cm_hello_world_cm7.bin.release -c 1
+ fw_setenv m7_addr 0x203c0000
+ fw_setenv fdt_file imx95-var-dart-sonata-m7.dtb
+ fw_setenv use_m7 yes
+ fw_setenv m7_bin cm_hello_world_cm7.bin.release
+ fw_setenv m7_addr_auxview 0x00000000

Finished: Please reboot, the m4 firmware will run during U-Boot
variscite-rproc-linux example on imx8mm-var-dart:
root@imx95-var-dart:~# /etc/remoteproc/variscite-rproc-linux -f /lib/firmware/cm_hello_world_cm7.elf.release -c 1
Cortex-M: Loading[  233.486354] remoteproc remoteproc1: powering up imx-rproc
 cm_hello_world_c[  233.493418] remoteproc remoteproc1: Booting fw image cm_hello_world_cm7.elf.release, size 48540
m7.elf.release
C[  233.502946] imx-rproc imx95-cm7: lmm(1) powered on
ortex-M: Starting[  233.508935] remoteproc remoteproc1: header-less resource table
[  233.516226] remoteproc remoteproc1: No resource table in elf
[  233.578202] remoteproc remoteproc1: remote processor imx-rproc is now up
Debugging a demo
JTAG Hardware
The Cortex-M firmware can be debugged using a JTAG debugger. Variscite recommends using a Segger J-Link Ultra+, J-Link Pro, or J-Link Wi-Fi debugger. You may also need a 9-pin Cortex-M adapter from Segger.
Note: If you encounter issues while using the ARM-JTAG-20-10 adapter from Olimex (such as the "TDO is constant high" error), you may need to leave pin 9 floating. This can be done by cutting the copper trace between the R2 pads, as indicated in the product page FAQ.
JTAG interface
The DART-MX95 exports JTAG interface via an optional 10-pin header, on the Sonata-Board top side. The DART-MX95 exports JTAG interface via an optional 10-pin header, on the DT8MCustomBoard top side.
Here is the pinout:
| pin | signal | description | pin | signal | description |
|---|---|---|---|---|---|
| 1 | JTAG_VREF |
JTAG IO reference voltage,
connected to SOM_3V3_PER via 150 Ohm. |
2 | JTAG_TMS | JTAG Mode Select signal |
| 3 | GND | Digital Ground | 4 | JTAG_TCK |
JTAG Clock signal,
include PD of 10K Ohm. |
| 5 | GND | Digital Ground | 6 | JTAG_TDO | JTAG Data Out signal |
| 7 | GND | Digital Ground | 8 | JTAG_TDI | JTAG Data In signal |
| 9 | JTAG_TRST_B |
JTAG Reset signal,
active low signal |
10 | POR_B |
Programmer Reset,
used to put the SOC in reset state. |
Please refer to SoM datasheet for further details.
Developing with IAR Embedded Workbench
NXP provides a detailed step by step procedure to develop and debug MCUXpresso firmware using IAR Embedded Workbench and SEGGER SEGGER J-Link. Please refer to online