Yocto Scarthgap 5.0 based on NXP BSP 6.6.23_2.0.0 with 6.6.23_2.0.0 Linux release
Installing required packages
Please make sure your host PC is running Ubuntu 18.04/20.04/22.04/24.04 64-bit and is up to date:
Then, install the following packages:
 $ sudo apt-get install python3 python3-pip python3-pexpect \
 python3-git python3-jinja2 python3-subunit python3-git liblz4-tool \
 python3-jinja2 python3-subunit curl zstd
For Ubuntu 20.04 and earlier, install python2:
Starting in Ubuntu 22.04, python2 is no longer available. Install the following to create a symbolic link from python to python3:
Ubuntu 24.04 introduced additional unprivileged user namespace restrictions. They must be disabled to avoid permission errors during Yocto fetch tasks when using Variscite's docker container.
Disable this restriction on the entire system for one boot:
Alternatively, disable this restriction using a persistent setting by adding a new file (/etc/sysctl.d/60-apparmor-namespace.conf) with the following contents:
$ echo 'kernel.apparmor_restrict_unprivileged_userns=0' | sudo tee /etc/sysctl.d/60-apparmor-namespace.conf
$ sudo sysctl -p /etc/sysctl.d/60-apparmor-namespace.conf
Install Docker:
Give permissions to run Docker without sudo:
Reference documentation
Download Yocto Scarthgap based on NXP BSP 6.6.23_2.0.0
Configure git user and email:
Fetch and install the Google git-repo tool:
$ mkdir -p ~/bin

# For Ubuntu 20.04 and older, install repo 2.32 according to https://gerrit.googlesource.com/git-repo/+/HEAD/docs/python-support.md:
$ curl https://commondatastorage.googleapis.com/git-repo-downloads/repo-2.32 > ~/bin/repo

# For Ubuntu 22.04 and newer, install the latest repo tool:
$ curl https://commondatastorage.googleapis.com/git-repo-downloads/repo > ~/bin/repo

# Give repo execute permissions and add it to the path:
$ chmod a+x ~/bin/repo
$ export PATH=~/bin:$PATH
Create a build directory:
Now, choose between downloading a release tag, and downloading the latest revision (recommended) and follow only one of the next two bullet sections, accordingly:
- Download the latest revision (recommended)
$ repo init -u https://github.com/varigit/variscite-bsp-platform.git -b scarthgap -m imx-6.6.23-2.0.0.xml
$ repo sync -j$(nproc)
or
- Download a release tag
Each release in https://github.com/varigit/variscite-bsp-platform/releases corresponds to a tag.
The tags are also listed in https://github.com/varigit/variscite-bsp-platform/tags
To specify a specific release/tag, run the following:
$ repo init -u https://github.com/varigit/variscite-bsp-platform.git -b refs/tags/TAG_NAME

For example:
$ repo init -u https://github.com/varigit/variscite-bsp-platform.git -b refs/tags/mx6-yocto-scarthgap-6.6.23_2.0.0-v1.0 -m imx-6.6.23-2.0.0.xml
$ repo sync -j$(nproc)
Start a Ubuntu Docker container:
Note: After Ubuntu Docker container is started you can see the shell prompt similar to: vari@yocto-22-04-fc27a5d:/workdir$
All references to commands without this prompt should be executed in a native terminal (outside Docker).
If you need to run a command using 'sudo' inside the container, the default password is ubuntu.
Setup and build Yocto
Supported images
The following images are provided by Variscite for evaluation purpose
- fsl-image-gui: Default Variscite demo image with GUI and without any Qt6 content. This image recipe works on all backends for Frame Buffer, Wayland and XWayland and the content is optimized to fit 512MB NAND flash.
- fsl-image-qt6: Extends fsl-image-gui image with Qt6 support and various Qt samples for Frame Buffer, Wayland and XWayland backends.
Will result in image size greater than 512 MB, which will not fit into NAND flash. Use SD card or eMMC to test.
The following images are provided by FSL Community BSP:
- fsl-image-machine-test: A console-only image that includes gstreamer packages, Freescale’s multimedia packages (VPU and GPU), and test and benchmark applications.
- fsl-image-mfgtool-initramfs: Small image to be used with Manufacturing Tool (mfg-tool) in a production environment.
- fsl-image-multimedia/fsl-image-multimedia-full: A console-only image that includes gstreamer packages and Freescale’s multimedia packages (VPU and GPU).
See the list of Yocto Project’s reference images in Yocto Project Reference Manual
Supported distros
The following distros can be used:
- fsl-imx-x11: Distro for X11 without wayland. This distro include x11 feature and doesn’ has wayland support.
- fsl-imx-fb: Distro for Framebuffer graphical backend. This distro doesn’t include X11 and wayland features.
- fsl-imx-wayland: Distro for Wayland without X11. This distro includes wayland feature but doesn’t have x11 support.
- fsl-imx-xwayland: Distro for Wayland with X11. This distro includes both wayland and X11 emulation features.
Note: Also standard Poky distros can be used
GStreamer support
FSL community BSP comes with gstreamer-imx, a set of GStreamer1.0 plugins for i.MX platform, which make use of the i.MX multimedia capabilities.
Some of the multimedia plugins do not work well with X11 and Wayland backends.
To get the most from gstreamer-imx, it is recommended to use fslc-framebufer distro with one of the demo images
Build XWayland GUI demo image
vari@yocto-22-04-fc27a5d:/workdir$ MACHINE=var-som-mx6 DISTRO=fsl-imx-xwayland . var-setup-release.sh build_xwayland
The above command is only mandatory for the very first build setup: whenever restarting a newer build session (from a different terminal or in a different time), you can skip the full setup and just run
Optional steps: local.conf customization
launch bitbake:
Without Qt content:
vari@yocto-22-04-fc27a5d:/workdir/build_xwayland$ bitbake fsl-image-gui

Or with Qt content:
vari@yocto-22-04-fc27a5d:/workdir/build_xwayland$ bitbake fsl-image-qt6
local.conf customization
Change the downloads directory
Create a /opt/yocto_downloads directory and set its permissions:
vari@yocto-22-04-fc27a5d:/workdir/build_xwayland$ sudo mkdir /opt/yocto_downloads
vari@yocto-22-04-fc27a5d:/workdir/build_xwayland$ sudo chmod 777 /opt/yocto_downloads/
Direct downloads to it, by replacing 'DL_DIR ?= "${BSPDIR}/downloads/"' with 'DL_DIR = "/opt/yocto_downloads/"' in conf/local.conf under your build directory:
vari@yocto-22-04-fc27a5d:/workdir/build_xwayland$ sed -i 's/DL_DIR ?= "${BSPDIR}\/downloads/DL_DIR = "\/opt\/yocto_downloads/g' conf/local.conf
Add Qt creator and Eclipse debug support to your images
Append the following to the conf/local.conf file in your Yocto build directory, to add Eclipse debug support to your images:
Append the following to the conf/local.conf file in your Yocto build directory, to add Qt creator debug support to your images:
Use systemd instead of SysV init
Append the following to the conf/local.conf file in your Yocto build directory, to use systemd instead of SysV init in your images:
DISTRO_FEATURES_append = " systemd"
DISTRO_FEATURES_BACKFILL_CONSIDERED_append = " sysvinit"
VIRTUAL-RUNTIME_init_manager = "systemd"
VIRTUAL-RUNTIME_initscripts = ""
IMX_DEFAULT_DISTRO_FEATURES_append = " systemd"
Create a read-only root file system
Append the following to the conf/local.conf file in your Yocto build directory, to create a read-only rootfs:
Build Results
The resulting images are located in tmp/deploy/images/var-som-mx6.
|
Image Name
|
Description
|
|---|---|
| fsl-image-gui-var-som-mx6.rootfs.wic.zst |
This image is for SD card boot.
It can be flashed as-is on an SD card that can then be used to boot your system, according to the relevant startup-guide of your product (usually requires to press the boot select button, or toggle a DIP switch). For detailed information refer to the Create a bootable SD card section. |
| fsl-image-gui-var-som-mx6.tar.gz |
Tarball with rootfs files.
Can be used to create an NFS root file system on the host. See the Yocto Setup TFTP/NFS section for more info. Also used to create our extended SD card. See the Create a bootable SD card section. |
| fsl-image-gui-var-som-mx6_128kbpeb.ubi | A complete UBI image containing a UBIFS volume, for writing to NAND flash with 128KiB PEB. |
| fsl-image-gui-var-som-mx6_256kbpeb.ubi | A complete UBI image containing a UBIFS volume, for writing to NAND flash with 256KiB PEB. |
| uImage | Linux kernel image, same binary for SD card/eMMC or NAND flash. |
| SPL-sd | SPL built for SD card boot or eMMC boot. |
| SPL-nand | SPL built for NAND flash. |
| u-boot.img-sd | U-Boot built for SD card boot or eMMC boot. |
| u-boot.img-nand | U-Boot built for NAND flash. |
|
Device Tree Name
|
SOM type
|
Carrier Board type
|
LCD Type
|
Evaluation Kit name
|
|---|---|---|---|---|
| imx6q-var-som-cap.dtb | VAR-SOM-MX6_V2 (Quad / Dual) | VAR-MX6CustomBoard | Capacitive touch |
VAR-DVK-MX6_V2-PRO
VAR-STK-MX6_V2 |
| imx6q-var-som-res.dtb | VAR-SOM-MX6_V2 (Quad / Dual) | VAR-MX6CustomBoard | Resistive touch |
VAR-DVK-MX6_V2-PRO
VAR-STK-MX6_V2 |
| imx6q-var-som-symphony.dtb | VAR-SOM-MX6_V2 (Quad / Dual) | Symphony-Board | Capacitive LVDS touch | N/A |
| imx6q-var-som-vsc.dtb | VAR-SOM-MX6_V2 (Quad / Dual) | VAR-SOLOCustomBoard | Capacitive LVDS touch | N/A |
| imx6dl-var-som-cap.dtb | VAR-SOM-MX6_V2 (DualLite / Solo) | VAR-MX6CustomBoard | Capacitive touch | N/A |
| imx6dl-var-som-res.dtb | VAR-SOM-MX6_V2 (DualLite / Solo) | VAR-MX6CustomBoard | Resistive touch | N/A |
| imx6dl-var-som-symphony.dtb | VAR-SOM-MX6_V2 (DualLite / Solo) | Symphony-Board | Capacitive LVDS touch | N/A |
| imx6dl-var-som-vsc.dtb | VAR-SOM-MX6_V2 (DualLite / Solo) | VAR-SOLOCustomBoard | Capacitive LVDS touch | N/A |
| imx6qp-var-som-cap.dtb | VAR-SOM-MX6_V2 (QuadPlus / DualPlus) | VAR-MX6CustomBoard | Capacitive touch | N/A |
| imx6qp-var-som-res.dtb | VAR-SOM-MX6_V2 (QuadPlus / DualPlus) | VAR-MX6CustomBoard | Resistive touch | N/A |
| imx6qp-var-som-symphony.dtb | VAR-SOM-MX6_V2 (QuadPlus / DualPlus) | Symphony-Board | Capacitive LVDS touch | N/A |
| imx6qp-var-som-vsc.dtb | VAR-SOM-MX6_V2 (QuadPlus / DualPlus) | VAR-SOLOCustomBoard | Capacitive LVDS touch | N/A |
| imx6dl-var-som-solo-cap.dtb | VAR-SOM-SOLO / VAR-SOM-DUAL | VAR-MX6CustomBoard | Capacitive touch | N/A |
| imx6dl-var-som-solo-res.dtb | VAR-SOM-SOLO / VAR-SOM-DUAL | VAR-MX6CustomBoard | Resistive touch | N/A |
| imx6dl-var-som-solo-symphony.dtb | VAR-SOM-SOLO / VAR-SOM-DUAL | Symphony-Board | Capacitive LVDS touch | N/A |
| imx6dl-var-som-solo-vsc.dtb | VAR-SOM-SOLO / VAR-SOM-DUAL | VAR-SOLOCustomBoard | Capacitive LVDS touch |
VAR-DVK-SOLO/DUAL
VAR-STK-SOLO/DUAL |
| imx6q-var-dart.dtb | DART-MX6 | VAR-DT6CustomBoard | Capacitive LVDS touch |
VAR-DVK-DT6
VAR-STK-DT6 |
Create a bootable SD card
SD Card Structure
This is the structure of our Recovery/Extended SD card:

The SD card is divided into 3 sections as shown in the picture above:
- The first unallocated 4MiB are saved space for U-Boot. It can be replaced using the dd command as described in the Yocto Build U-Boot section.
- The first partition is a fat16 partition used for the device tree files and the kernel image file. You can copy them as described in the Yocto Build Linux section.
- The second partition is an ext4 partition that contains the complete root filesystem (including the kernel modules).
Note: This partition includes an unallocated area to ensure compatibility with all 8 GB SD cards, as their actual sizes may vary. For instructions on optimizing the usage of your SD card's capacity, refer to the section Extending the SD Card Size.
Yocto pre-built bootable SD card
The Yocto build products contains many files as explained in the Build Results section. For example, fsl-image-gui-var-som-mx6.rootfs.wic.zst, depending on your build. This is a complete and bootable image ready to be flashed directly to an SD card.
Example usage:
# For GUI-X11 & Qt6-X11
$ cd ~/var-fslc-yocto/
Or
# For Qt6-FB
$ cd ~/var-fslc-yocto/build_fb

# For fsl-image-gui image (GUI-X11)
$ zstdcat tmp/deploy/images/var-som-mx6/fsl-image-gui-var-som-mx6.rootfs.wic.zst | sudo dd of=/dev/sdX bs=1M && sync
Or
# For fsl-image-qt6 image (Qt6-X11 & Qt6-FB)
$ zstdcat tmp/deploy/images/var-som-mx6/fsl-image-qt6-var-som-mx6.rootfs.wic.zst | sudo dd of=/dev/sdX bs=1M && sync
Replace sdX with the right device name. This can be obtained by "dmesg" command on your host Linux PC, after the SD card reader is inserted.
Note: Booting your system from an SD card requires pressing the boot-select button, or switching the relevant DIP switch to "Boot from SD card", according to the relevant start-up guide of your system
Note: If using any of the native .rootfs.wic.zst images output from Yocto, these will only have a default partition size of slightly less than 8 GB in order to fit on most SD cards. In order to maximize all usable space on the SD card, please see the section on Extending the SD Card Size.
Yocto Recovery Image
Beginning in Yocto Langdale, Variscite has released a new recovery Yocto image recipe called "var-recovery-image." This image is used to create a bootable SD card that contains another target image to be programmed to the eMMC. See the yocto Recovery SD card or the more manual Installing Yocto to the SOM's internal storage articles for specifics of installing a recovery image.
Usage:
By default, the recovery image boots fsl-image-gui and contains a fsl-image-gui target image to be programmed to eMMC. You can also specify a different target eMMC image to be embedded in the recovery image by setting this variable in local.conf:
Additionally, the recovery image output file name can be modified by setting something like the following in local.conf:
This is an example of configurations added to local.conf:
VAR_RECOVERY_SD_NAME = "mx6__yocto-scarthgap-6.6.23_2.0.0-v1.0__android-8.0.0_1.0.0-v1.0"
VAR_RECOVERY_SD_IMAGE = "recipes-fsl/images/fsl-image-gui-chromium.bb"
VAR_RECOVERY_TARGET_ROOTFS = "fsl-image-gui-chromium"
To create a recovery image, run the following from your Yocto environment:
Using the default configuration, this will produce an output relative to the build folder of "./tmp/deploy/images/var-som-mx6/var-recovery-image-var-som-mx6.rootfs.wic.zst" that can be flashed to the SD card.
If you set the variables mentioned above, this will produce a recovery image relative to the build folder of "./tmp/deploy/images/var-som-mx6/mx6__yocto-scarthgap-6.6.23_2.0.0-v1.0__android-8.0.0_1.0.0-v1.0.wic.zst"
Note: Please see the var-recovery-image recipe source for advanced usages of the recovery image.
Extending the SD Card Size
Flashing the default .rootfs.wic.zst images from Yocto results in a rootfs that does not utilize the entire SD card. This section explains how the SD card can be extended on the build host after flashing.
Procedure:
Begin with an SD card on which you have previously flashed a Yocto .rootfs.wic.zst image. Ensure the SD card is inserted and the device present (i.e. /dev/sda, /dev/mmcblk0, etc.)
Note: Below replace /dev/sdX with your actual device (i.e. /dev/sda)
Start by running fdisk as below and typing "p" and enter to print current partitions. You should see a layout similar to below but numbers may differ depending on card sizes. Note that the partition starts at 16,384 (bytes offset 16384*512) which is to account for the boot content explained above.
$ sudo fdisk /dev/sdX

Welcome to fdisk (util-linux 2.37.2).
Changes will remain in memory only, until you decide to write them.
Be careful before using the write command.


Command (m for help): p
Disk /dev/sdX: 59.48 GiB, 63864569856 bytes, 124735488 sectors
Disk model: MassStorageClass
Units: sectors of 1 * 512 = 512 bytes
Sector size (logical/physical): 512 bytes / 512 bytes
I/O size (minimum/optimal): 512 bytes / 512 bytes
Disklabel type: dos
Disk identifier: 0x5ebf1617

Device     Boot Start      End  Sectors  Size Id Type
/dev/sdX1       16384 15165439 15149056  7.2G 83 Linux
Next, run the following sequence of commands followed by enter with each step explained with a "-" to the right. Each command/input should be followed by enter:
- d - Delete current partition (1).
- n - Create a new parition.
-
- Empty, hit enter only which will leave default response p for primary partition.
-
- Empty, hit enter only which will leave default response 1 for first partition.
- 16384 - Enter 16384 to begin partition past bootloader section.
-
- Empty, hit enter only which will leave last sector as default which should choose ending size of the SD card.
- N - Answers no to not remove the ext4 signature on the disk
- p - Print output and verify before we write. We should see the starting offset the same and the end expanded to fill the SD card.
- w - Write output to disk
See the full log of the above sequence below:
Command (m for help): d
Selected partition 1
Partition 1 has been deleted.

Command (m for help): n
Partition type
   p   primary (0 primary, 0 extended, 4 free)
   e   extended (container for logical partitions)
Select (default p):

Using default response p.
Partition number (1-4, default 1):
First sector (2048-124735487, default 2048): 16384
Last sector, +/-sectors or +/-size{K,M,G,T,P} (16384-124735487, default 124735487):

Created a new partition 1 of type 'Linux' and of size 59.5 GiB.
Partition #1 contains a ext4 signature.

Do you want to remove the signature? [Y]es/[N]o: N

Command (m for help): p

Disk /dev/sdX: 59.48 GiB, 63864569856 bytes, 124735488 sectors
Disk model: MassStorageClass
Units: sectors of 1 * 512 = 512 bytes
Sector size (logical/physical): 512 bytes / 512 bytes
I/O size (minimum/optimal): 512 bytes / 512 bytes
Disklabel type: dos
identifier: 0x5ebf1617

Device     Boot Start       End   Sectors  Size Id Type
/dev/sdX1       16384 124735487 124719104 59.5G 83 Linux

Command (m for help): w

The partition table has been altered.
Calling ioctl() to re-read partition table.
Syncing disks.
Finally, the file system needs to be resized on the disk to fill the now larger partition. Do that as follows:
$ sudo e2fsck -f /dev/sdX1
e2fsck 1.46.5 (30-Dec-2021)
root: recovering journal
Pass 1: Checking inodes, blocks, and sizes
Pass 2: Checking directory structure
Pass 3: Checking directory connectivity
Pass 4: Checking reference counts
Pass 5: Checking group summary information
root: 43155/947488 files (0.1% non-contiguous), 674097/1893632 blocks

$ sudo resize2fs /dev/sdX1
resize2fs 1.46.5 (30-Dec-2021)
Resizing the filesystem on /dev/sdX1 to 15589888 (4k) blocks.
The filesystem on /dev/sdX1 is now 15589888 (4k) blocks long.

$ sync
Again, numbers and output should differ slightly depending on your card.
Your rootfs image should now fill the entire SD card and is ready to boot.
Boot the board with a bootable SD card
Setting the Boot Mode
Follow the instruction below according to the appropriate carrier board type:
MX6CustomBoard
Booting your MX6CustomBoard system from SD card requires pushing the middle button while powering up the system. See picture below.
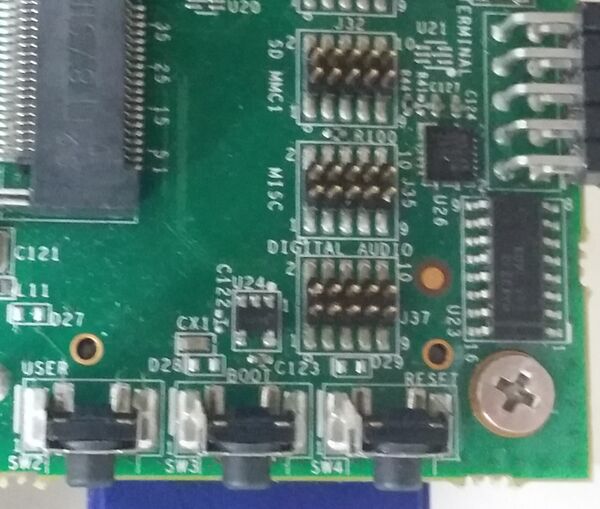
To boot a board using an SD card, follow the steps below:
- Power-off the board.
- Insert the SD card into the SD/MMC slot of the carrier board (DVK)
- Push the middle button (Boot Select) and hold
- Power-up the board
- Release the middle button (Boot Select) after system starts to boot.
- The board will automatically boot into Linux from the SD card
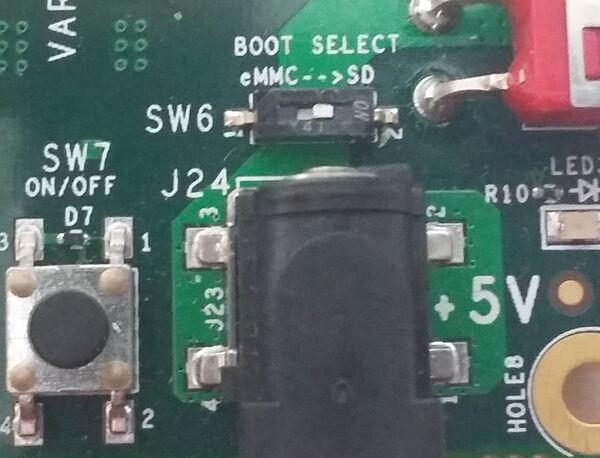
SoloCustomBoard
Booting your system requires switching the relevant DIP switch to "Boot from MMC". See picture below.
To boot board with SD card, Follow the steps below:
- Power-off the board.
- Insert the SD card into the SD/MMC slot of the carrier board (DVK)
- Switch the relevant DIP switch to "Boot from MMC"
- Power-up board
- The board will automatically boot into Linux from SD card
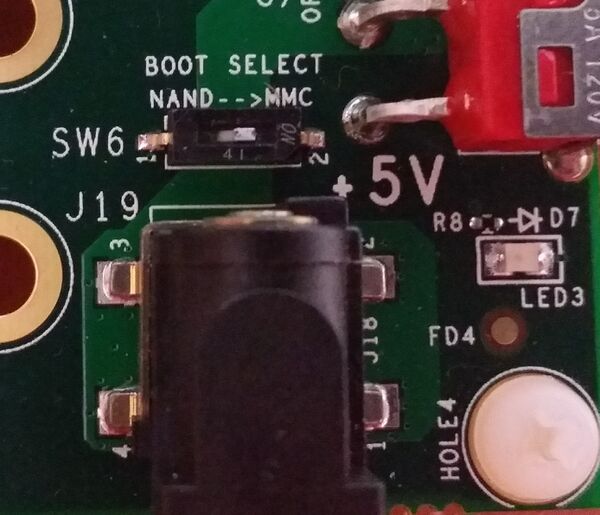
DT6CustomBoard
Booting your system requires switching the relevant DIP switch to "Boot from SD card". See picture below.
To boot board with SD card, Follow the steps below:
- Power-off the board.
- Insert the SD card into the SD/MMC slot of the carrier board (DVK)
- Switch the relevant DIP switch to "Boot from SD card"
- Power-up board
- The board will automatically boot into Linux from SD card
Symphony-Board
Booting your system requires switching the relevant DIP switch to "Boot from SD card". See picture below.
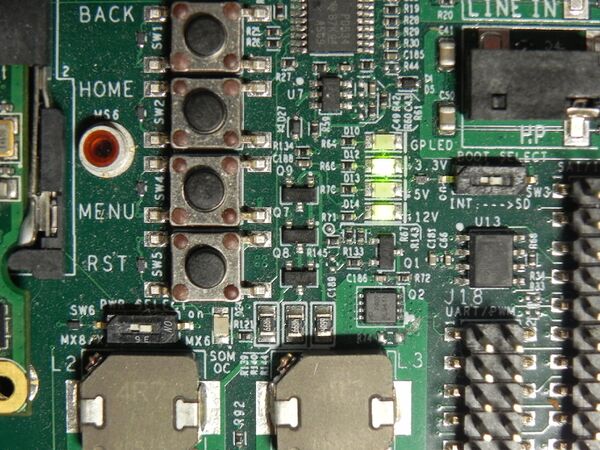
To boot board with SD card, Follow the steps below:
- Power-off the board.
- Insert the SD card into the SD/MMC slot of the carrier board (DVK)
- Switch the SW3 DIP switch to "Boot from SD"
- Switch the SW6 DIP switch to "PWR Select for MX6"
Leaving SW6 in the wrong (MX8) position may lead to serious SoM damages.
- Power-up board
- The board will automatically boot into Linux from SD card
Automatic device tree selection in U-Boot
As shown in the Build Results table above, we have different kernel device trees, corresponding to our different H/W configurations.
We implemented a script in U-Boot's environment, which sets the fdt_file environment variable based on the detected hardware.
Enable/Disable automatic device tree selection
To enable the automatic device tree selection in U-Boot (already enabled by default):
To disable the automatic device tree selection in U-Boot, set the device tree file manually:
Useful example: To list all files in the boot partition (where the dtb files are by default) of an SD card:
Flash images to NAND/eMMC
Please refer to Yocto NAND Flash Burning guide.
Yocto Image Customization
Update Yocto Scarthgap to latest revision
From time to time we update the Yocto sources (especially meta-variscite) with new features and bug fixes.
Follow the Download the latest revision (recommended) bullet section of the Download Yocto Scarthgap based on Freescale Community BSP step again to update your tree to the latest revision, and rebuild your image.
Update Yocto Scarthgap to a release tag
Follow the Download a release tag bullet section of the Download Yocto Scarthgap based on Freescale Community BSP step to update your tree to a release tag, and rebuild your image.
Forcing Clean Build
In order to update the kernel, U-Boot and rootfs:
vari@yocto-22-04-fc27a5d:/workdir/build_xwayland$ bitbake -c cleanall u-boot-variscite linux-variscite kernel-module-imx-gpu-viv ti-compat-wireless-wl18xx wl18xx-firmware cryptodev-module

for GUI image
vari@yocto-22-04-fc27a5d:/workdir/build_xwayland$ bitbake -c clean fsl-image-gui
for Qt6 image
vari@yocto-22-04-fc27a5d:/workdir/build_xwayland$ bitbake -c clean fsl-image-qt6
Qt6 for Embedded Linux
To run Qt6 applications without X11 backend the platform specific plugins (e.g. EGLFS or LinuxFB) should be configured with QT_QPA_PLATFORM environment variable or with -platform command-line.
See more information on Qt6 customization for Embedded Linux here
Configure EGLFS Plugin
export QT_QPA_EGLFS_PHYSICAL_HEIGHT=95
export QT_QPA_EGLFS_PHYSICAL_WIDTH=160
export QT_QPA_EGLFS_HEIGHT=480
export QT_QPA_EGLFS_WIDTH=800
export QT_EGLFS_IMX6_NO_FB_MULTI_BUFFER=1
export QT_QPA_EGLFS_DEPTH=24
export QT_QPA_PLATFORM=eglfs
Configure Touch Input
When no windowing system is present, the mouse, keyboard, and touch input are read directly via evdev or tslib.
Evdev
By default, the Qt6 uses automatic device discovery based on libudev. In case you want to override the default touchscreen configuration the following parameters can be used:
- /dev/input/... - Specifies the name of the input device. When not given, Qt looks for a suitable device either via libudev or by walking through the available nodes.
- rotate - On some touch screens the coordinates must be rotated, which is done by setting rotate to 90, 180, or 270.
- invertx and inverty - To invert the X or Y coordinates in the input events, pass invertx or inverty.
Tslib
Tslib is used for resistive single-touch touchscreens and should be pre-configured with:
export TSLIB_TSEVENTTYPE='INPUT'
export TSLIB_TSDEVICE='/dev/input/touchscreen0'
export TSLIB_CALIBFILE='/etc/pointercal'
export TSLIB_CONFFILE='/etc/ts.conf'
export TSLIB_CONSOLEDEVICE='none'
export TSLIB_FBDEVICE='/dev/fb0'
export TSLIB_PLUGINDIR='/usr/lib/ts'
export QT_QPA_EGLFS_TSLIB=1
export QT_QPA_FB_TSLIB=1
It is recommended to put the above setup inside /etc/profile.d/tslib.sh.
Running Qt6 Applications
$ cd /usr/share/cinematicexperience-1.0; ./Qt5_CinematicExperience --platform eglfs
$ cd /usr/share/qt5everywheredemo-1.0; ./QtDemo --platform eglfs
$ cd /usr/share/qtsmarthome-1.0; ./smarthome --platform eglfs
UBIFS
By default we create ubifs image for 512MB NAND flash size.
You can change the size by editing ~/var-fslc-yocto/sources/meta-variscite-bsp-imx/conf/machine/include/variscite.inc
and comment / uncomment the relevant section based on size.
DDR size and Contiguous Memory Allocator
By default Freescale allocates 256MB of RAM to the Contiguous Memory allocator. This is for proper operation of the IPU VPU, X11 etc. On VAR-SOM-SOLO with 256MB DDR RAM size, it will cause a kernel freeze during boot. Adding cma=32MB to the bootargs parameters is required to fix.
Make changes to the rootfs
The following is usually not the recommended way to work with Yocto.
You should usually create new specific recipes (.bb files) and/or append to specific present recipes by using .bbappend files.
However, if you are not yet experienced enough with Yocto, and you just want to quickly add your files to the resultant file system (or make any other change to it), you can do it in a general way, by using the following variable:
ROOTFS_POSTPROCESS_COMMAND

    Specifies a list of functions to call once the OpenEmbedded build system has created the root filesystem.
    You can specify functions separated by semicolons:

         ROOTFS_POSTPROCESS_COMMAND += "function; ... "

    If you need to pass the root filesystem path to a command within a function, you can use ${IMAGE_ROOTFS},
    which points to the directory that becomes the root filesystem image. See the IMAGE_ROOTFS variable for more information.
The functions will be called right after the root filesystem is created and right before it is packed to images (.rootfs.wic.zst, .ubi, .tar.gz, etc.).
Example
Let's say you have your files that you want to put in the filesystem arranged on your host under a directory called /my_rootfs_additions, like the following:
my_rootfs_additions/
├── data
│   ├── example.m4v
│   └── example.bin
├── etc
│   └── example.conf
└── home
    └── root
        └── .example
And let's say you want to build the fsl-image-gui image.
Create a file called ~/var-fslc-yocto/sources/meta-variscite-bsp-imx/recipes-images/images/fsl-image-gui.bbappend
with the following content:
add_my_files() {
    cp -r /my_rootfs_additions/*  ${IMAGE_ROOTFS}/
}

ROOTFS_POSTPROCESS_COMMAND += "add_my_files;"
Now, when you bitbake fsl-image-gui, the files in /my_rootfs_additions will be added to the rootfs (be careful when overwriting files).