Part 2 - Adding Encryption, Authentication and Verification
In the previous part, we built a minimal client/server application that exchanged commands over plain TCP. While functionally correct, it had several serious security weaknesses:
- The connection was unencrypted, allowing attackers to read or modify traffic (e.g., via a man-in-the-middle attack).
- The client had no way to verify that it was communicating with the intended server.
- The server accepted connections from any client - including cloned or unauthorized embedded devices.
To secure the communication, we need to ensure three fundamental properties:
1. Encryption (Confidentiality)
The transmitted data must not be readable by anyone except the intended recipient.
2. Authentication (Identity)
Both sides must be able to verify who they are communicating with:
- The embedded device must verify the server’s identity.
- The server should eventually verify that the client is an authentic device and not a clone.
3. Verification (Integrity)
The receiver must be able to detect if transmitted data was modified in t Even if an attacker cannot decrypt encrypted data, they might attempt to manipulate encrypted packets. Integrity protection ensures such modifications are detected.
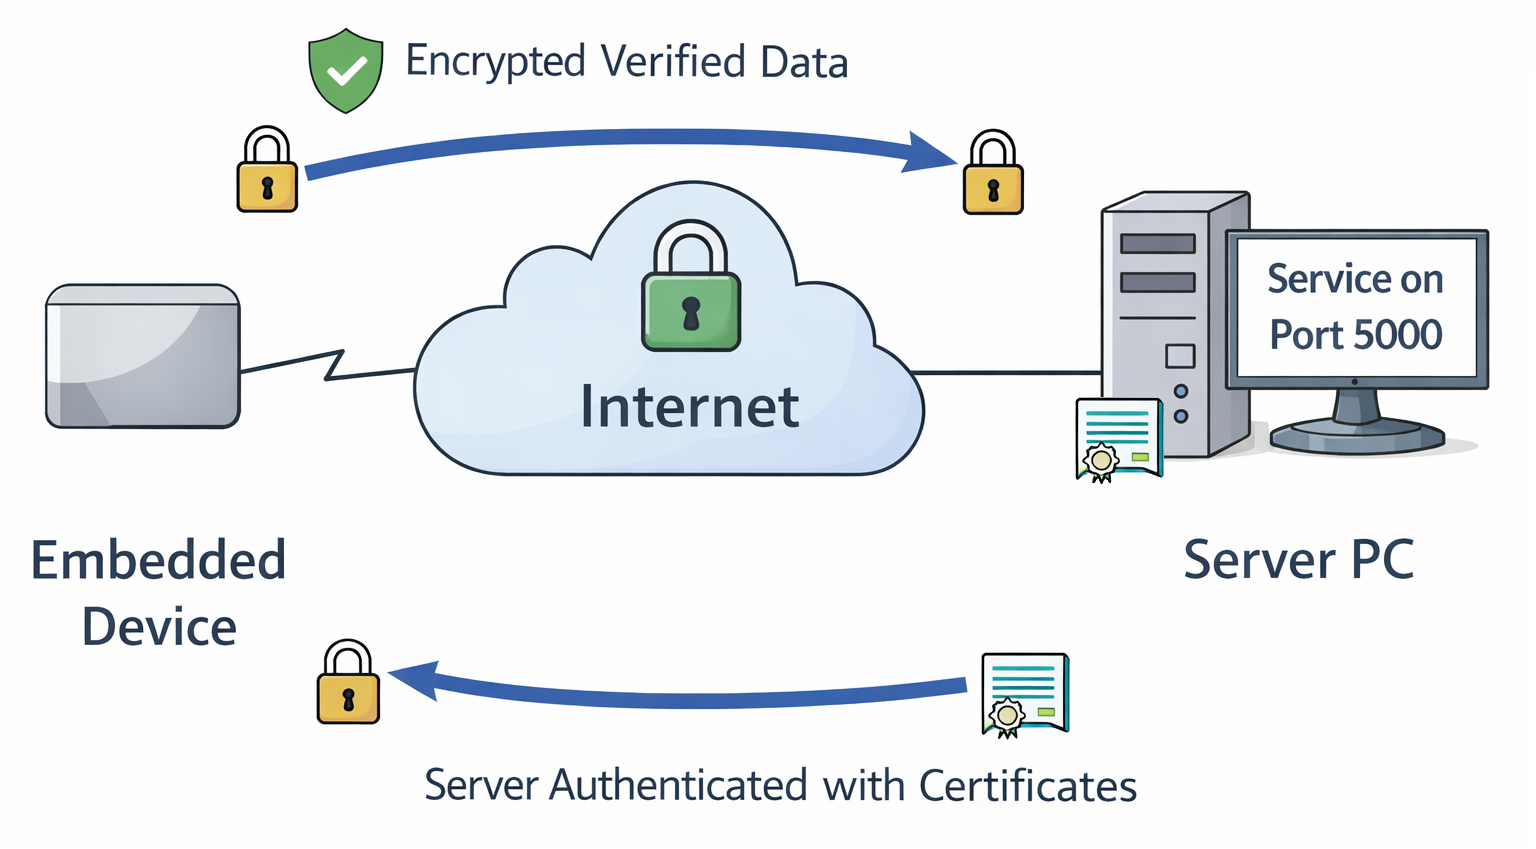
To achieve this, we will use TLS (Transport Layer Security).
Enabling TLS on the Server
We start by enabling TLS on the server side. The core logic of the application remains the same - we simply wrap the TCP connection inside an SSL/TLS context.
SERVER_CERT = "server.crt"
SERVER_KEY = "server.key"

[..]

def main():
    # ---- TLS context (server side) ----
    context = ssl.SSLContext(ssl.PROTOCOL_TLS_SERVER)

    context.load_cert_chain(
        certfile=SERVER_CERT,
        keyfile=SERVER_KEY
    )

    with socket.socket(socket.AF_INET, socket.SOCK_STREAM) as server_sock:
        server_sock.bind((HOST, PORT))
        server_sock.listen()
        print(f"TLS server listening on {HOST}:{PORT}")

        while True:
            raw_conn, addr = server_sock.accept()

            # Wrap each connection with TLS
            tls_conn = context.wrap_socket(raw_conn, server_side=True)

            thread = threading.Thread(
                target=handle_client,
                args=(tls_conn, addr),
                daemon=True
            )
            thread.start()
Two new files are referenced:
- server.crt: The server certificate (contains public key + identity).
- server.key: The server’s private key (used for authentication and key exchange).
The private key must always remain confidential on the server.
Understanding Certificates and Certificate Authorities (CAs)
TLS relies on digital certificates to establish trust between systems that may never have interacted before.
A certificate binds three things together:
- An identity (e.g., a hostname, IP address or device identifier)
- A public key
- A digital signature from a trusted Certificate Authority (CA)
Certificates are not generated during normal operation. They are created as part of a provisioning or deployment process - for example when a server is set up, or when an embedded device is manufactured. This process typically involves generating a key pair and creating a Certificate Signing Request (CSR), which is then signed by a CA.
The same workflow applies whether you are provisioning a server certificate or later a client certificate for device authentication.
What Does a Certificate Authority Do?
A Certificate Authority (CA) is a trusted entity that signs certificates. By signing a certificate, the CA confirms:
"I have verified that the owner of this public key is allowed to use this identity."
The CA's own certificate acts as a trust anchor. Any system that trusts the CA certificate can verify certificates signed by it.
In development environments, it is common to create your own CA. In production, certificates will be signed by a corporate or public CA.
What Happens During TLS Certificate Validation?
When a TLS connection is established, certificate validation happens during the handshake:
- The server presents its certificate to the client.
- The client verifies:
- The certificate is signed by a trusted CA.
- The certificate is within its validity period.
- The identity (e.g., hostname or IP address) matches the intended server.
- The client verifies the CA's digital signature using the CA's public key.
- The server proves possession of the corresponding private key during the handshake.
Only if all checks succeed does the TLS session proceed.
Importantly, the CA is not contacted during this process. Validation is performed locally using the pre-installed CA certificate.
This mechanism allows systems to authenticate each other securely - even if they have never communicated before and without sharing secrets in advance.
Creating a Local Certificate Authority (CA)
⚠️ Creating a local CA is for development purposes only
1. Generate the CA private key
This creates a 4096-bit RSA private key.
Keep this file secure - it represents the trust anchor of your setup.
2. Create the CA certificate
$ openssl req -x509 -new -nodes -key ca.key -sha256 -days 3650 -out ca.crt \
    -subj "/CN=My Test CA" \
    -addext "basicConstraints=critical,CA:TRUE" \
    -addext "keyUsage=critical,keyCertSign,cRLSign"
The resulting ca.crt contains no secrets and can be distributed to clients.
Clients use it to verify certificates signed by this CA.
You can inspect it with:
Creating the Server Private Key
This generates an Elliptic Curve (EC) private key using the NIST P-256 curve.
We use Elliptic Curve Cryptography (ECC) because it is broadly supported across TLS implementations and hardware security modules (including TPM 2.0), while offering modern security with smaller key sizes than RSA.
ℹ️ About key sizes and algorithms
In this example:
- "The CA uses a 4096-bit RSA key."
- "The server uses a NIST P-256 (EC) key."
The CA key is used infrequently (for signing certificates), and is typically long-lived, so stronger conservative parameters are appropriate. The server key participates in every TLS handshake, so performance and handshake latency matter.
Always check up-to-date recommendations from trusted sources (e.g., NIST or your security policy) when selecting algorithms and key sizes.
You can extract the public key from the private key:
However, distributing just the public key is not sufficient - it does not establish trust. That's why we need a CA-signed certificate.
Creating the Certificate Signing Request (CSR)
For this example, the server runs at IP 192.168.178.2.
Adjust this value to match your setup or use a fully qualified domain name (FQDN).
In a deployment setup the server.csr would be sent to the corporate or
public CA. In this development setup we will do this step ourselves.
Signing the Server Certificate with the CA
$ openssl x509 -req \
  -in server.csr \
  -CA ca.crt -CAkey ca.key -CAcreateserial \
  -out server.crt -days 365 -sha256 \
  -extfile /dev/stdin - <<'EOF'
basicConstraints=CA:FALSE
keyUsage=digitalSignature,keyEncipherment
extendedKeyUsage=serverAuth
subjectAltName=IP:192.168.178.2
EOF

# Here starts the output from the command
Certificate request self-signature ok
subject=CN=server
You now have:
server.key– Server private key (keep secure)server.crt– Server certificate (sent to client during handshake)ca.crt– CA certificate (installed on the embedded device, typically renamed toserver_ca.pem)
Updating the Client
On the client side, the logic changes only slightly. We create an SSL context and configure it to trust our CA.
#!/usr/bin/env python3
import socket
import ssl
import sys

SERVER_PORT = 5000

SERVER_CA   = "server_ca.pem"   # CA that signed server cert

def main():
    if len(sys.argv) != 2:
        print(f"Usage: {sys.argv[0]} <server_ip_or_hostname>")
        sys.exit(1)

    server_host = sys.argv[1]

    context = ssl.create_default_context(ssl.Purpose.SERVER_AUTH)
    context.load_verify_locations(cafile=SERVER_CA)

    with socket.socket(socket.AF_INET, socket.SOCK_STREAM) as sock:
        with context.wrap_socket(sock, server_hostname=server_host) as tls_sock:
            tls_sock.connect((server_host, SERVER_PORT))

            command = "GET_SECRET\n"
            print(f"Sending: {command.strip()}")
            tls_sock.sendall(command.encode("utf-8"))

            response = tls_sock.recv(1024)
            print(f"Received: {response.decode().strip()}")

if __name__ == "__main__":
    main()
The key change:
The raw socket is wrapped in a TLS context that verifies the server certificate
against server_ca.pem.
Running the TLS Version
Server output:
$ ./server.py
TLS server listening on 0.0.0.0:5000
[+] TLS connection from ('192.168.178.2', 48980)
    Cipher: ('TLS_AES_256_GCM_SHA384', 'TLSv1.3', 256)
[('192.168.178.2', 48980)] Received: GET_SECRET
[-] Client disconnected: ('192.168.178.2', 48980)
Client output:
From the server log we can observe:
- TLSv1.3 is negotiated.
- AES-256 is used for symmetric encryption (confidentiality).
- SHA-384 ensures integrity protection (verification).
Cipher suites are negotiated between client and server, so your output may differ.
ℹ️ Where is EC NIST P-256 used?
EC NIST P-256 is used during the handshake for authentication and certificate verification - not for encrypting bulk application data. Once the handshake completes, symmetric encryption (e.g., AES) protects the actual traffic.
Verifying Server Authentication
Authentication happens automatically during the TLS handshake.
You can intentionally break it by:
- Using a different
server_ca.pem - Connecting to a different IP address than the one in the certificate
Example:
$ ./client.py 192.168.178.72
Traceback (most recent call last):
  File "/home/variscite/tpm-demos/src/part2/./client.py", line 32, in <module>
    main()
    ~~~~^^
  File "/home/variscite/tpm-demos/src/part2/./client.py", line 22, in main
    tls_sock.connect((server_host, SERVER_PORT))
    ~~~~~~~~~~~~~~~~^^^^^^^^^^^^^^^^^^^^^^^^^^^^
  File "/usr/lib/python3.14/ssl.py", line 1405, in connect
    self._real_connect(addr, False)
    ~~~~~~~~~~~~~~~~~~^^^^^^^^^^^^^
  File "/usr/lib/python3.14/ssl.py", line 1396, in _real_connect
    self.do_handshake()
    ~~~~~~~~~~~~~~~~~^^
  File "/usr/lib/python3.14/ssl.py", line 1372, in do_handshake
    self._sslobj.do_handshake()
    ~~~~~~~~~~~~~~~~~~~~~~~~~^^
ssl.SSLCertVerificationError: [SSL: CERTIFICATE_VERIFY_FAILED] certificate verify failed: IP address mismatch, certificate is not valid for '192.168.178.72'. (_ssl.c:1081)
The client refuses to connect because the certificate identity does not match the server address.
This is exactly what we want.
What We Achieved
Compared to Part 1, we now have:
- Encrypted communication (no readable plaintext in packet captures)
- Integrity protection (tampering is detected)
- Server authentication (identity verification via certificates)
If you repeat the tcpdump experiment from Part 1, you will no longer see readable application data.
What Is Still Missing?
We currently authenticate the server - but not the client.
This setup is similar to a public web server (without a login):
- Users verify they are connected to the correct website.
- The website does not necessarily verify who the user is.
In many embedded use cases, this is not sufficient.
You may want to ensure that:
- Only devices you manufactured can connect.
- Cloned or emulated devices are rejected.
- Security-sensitive API calls (like GET_SECRET) are restricted to authorized hardware.
To achieve this, we need client authentication (mutual TLS).
In the next part, we will extend the setup to include client authentication: 👉 Part 3 – Adding Client Authentication